Wednesday, February 18, 2015

Embossing paste techniques

Hey Guys,

Sharing a quick peek for some cards created for Lulupu! Do head over to the Lulupu blog and check out the cards and the techniques used.


If you liked the cards, leave some love !

Thanks for stopping by!

Love

Dolly

Sunday, January 11, 2015

Squash Fold Card For Lulupu


Hey Crafty Folks, 

Hope you all had a good start to the new year. Here's a quick sneak peak at my first project for 
Lulupu  . Do check it out.

Love, 

Dolly


Thursday, November 27, 2014

Some more cards made in November!

Hello dear readers,

Of-late, I haven't been getting time to blog much. So I thought of quickly posting pictures of some cards I made in this month!

Enjoy! Lemme know which one you liked the most.

Thanks for stopping by!

Love

Dolly


Project No: 3 for Winnie & Walter's Playdate No. 4

Hello once again,

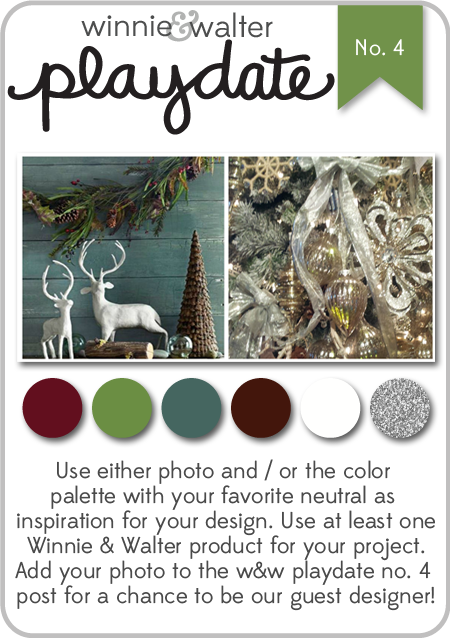
I created yet another card for the Winnie & Walter's Playdate No 4. As I said earlier, I was super excited when I saw the inspiration picture and the color palette!

So I wanted to play along, but got some time only a couple of days back so I am making the most of it.
w&w_playdate4_oct2014

Here's the card I created using the olive green color from the palette & the gold, silver, snowflakes from the picture. I also used some of the burgundy and silver for my sentiment.

To create my background I have clear heat embossed many sentiments from the Big, Bold set which I have. I added a gold and silver snowflake from SSS and used some gold string with it. The sentiment was heat embossed in white on a burgundy strip. I also used a silver strip just to compliment the silver snowflake.

Thanks for stopping by!

Love.

Dolly

PS: Do scroll down to see some close ups!


Wednesday, November 26, 2014

Project No: 2 for Winnie & Walter's Playdate No. 4

Hello again. 

Another post to add my 2nd project for the Winnie & Walter's Playdate 4. 

Check out the inspiration picture and color combination!

w&w_playdate4_oct2014

So, here's what I created using the lovely color palette and some things from the inspiration picture!

I loved the deep burgundy color in the palette and gold and silver from the inspiration picture and chose to create my frame with that. To create a background for the picture I just overlaid some pattern paper on top of a white cardstock which I cut using my design scissors. For the sentiments, I used the Big, Bold and Blessings stamp set heat embossed in Liquid platinum, which I layered on the frame using some foam tape. To finish off, I added some pearls and a cute button with some gold string.

Hope you like it!


Do visit Winnie & Walter to check out the playdate 4 and Julie's take on it. It will inspire you to create something wonderful. There is still time till 28th Nov. 

Thanks for stopping by.

Love, Dolly

Project No: 1 for Winnie & Walter's Playdate No. 4


Hello everyone. 

This is a quick post to add my project for the Winnie & Walter's Playdate 4. 

They have a lovely inspiration picture and color combination!

w&w_playdate4_oct2014


From the moment I had seen this, I had so many ideas popping in my head. But in some days work became so hectic that I completely forgot about it. Thanks to Julie's message on Facebook, I was reminded again! 

So, here's what I created using the lovely color palette and some things from the inspiration picture!

I had decided to create a photo frame for a close friend as a christmas gift. I knew my main color has to be the lovely olive green (used to create the frame) and to add a couple of more colors I decided to go with white and silver. That completed my color choices. 
To add something of interest, I used the snowflake and the silver ribbon from the inspiration picture  to add a snow flake die from SSS and added a small pearl. I loved how it looks in silver metallic paper. 
For my sentiment, I used the Big, Bold and Happy in white embossing. I wanted to keep the project clean and simple so I just added a chipboard sticker and a cute button with some silver ribbon! That completed the frame. I think it looks just enough and not too cluttered.

I would love to hear from you to know if something's missing or its good to go as it is now!

Do visit Winnie & Walter to check out the playdate 4 and Julie's take on it. It will inspire you to create something wonderful. There is still time till 28th Nov. I am gonna make another project hopefully before 28th. !

Thanks for stopping by.

Love, Dolly


Friday, November 14, 2014

Guest Design for Lulupu: Pinwheel Card

Hello Everyone,  

This post is a very special one for me, any guesses why ? :) I have been invited to guest design for Lulupu.com - India's favourite Online Paper Craft Supplies Store. 
And, this is my very first guest design! Cheers! to many more to come :)

The project which I will be sharing with you is an interactive card (inspired by: Video Tutorial: Pinwheel Spinner Card) for the occasion of Children's Day. Any kid would love this card and want to continue to play with it. So lets see how this card was made. 


First, I started out with a 2 x 2 inch pattern paper which was cut from all four corners till the centre of the piece.


Then I created a pinwheel, by bringing one corner of every piece and sticking it to the centre. 
You can also refer to this easy pictorial representation. 
To finish the pinwheel, I added a button with a pearl embellishment from my stash.


To make the card, I chose A2 size pre-folder card base and two additional patterned paper which would coordinate with my pinwheel. 
The pattern paper was cut 1/4" smaller than the card base.


I created a slot for the pinwheel but cutting out the paper with rounded ends. To the finished pinwheel, I added some double sided foam tape and adhered that to a 1 rupee coin. On top of this, I added another piece of double sided foam tape. 
The pinwheel with the foam tape side up was adjusted in between the slot and the second 1 rupee coin was adhered on top which made a perfect sandwich for the pinwheel.

The sentiment "Happy Day" was stamped in black ink prior to adding it to the base of the card and a quick array of sequins was added for the charm.

This was adhered to the card base by loads of foam tape to give dimension. 


Here is the final look of the card:


Now, what is an interactive card if you cannot see any activity, so I have a video for you which shows how much fun this card can be ! Please click on the link below and it will take you to the video.

Pinwheel Card

Hope you liked this card & are inspired to make one for yourself! :)

Till my next card! Adios!

Love
Dolly